JSON Web Token (JWT) Best Practices
Today, JSON Web Tokens are widely used in applications to share security information. Still, they are not entirely foolproof and could open doors for attackers.
However, we can avoid these shortcomings if we use JWTs correctly.
Choose the Most Appropriate Algorithm
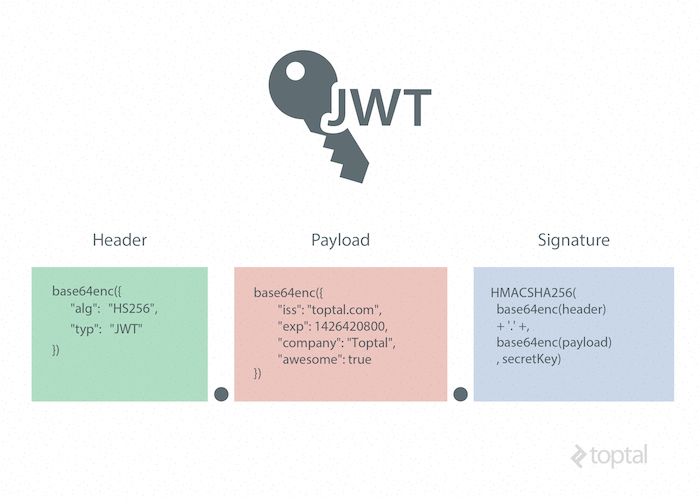
A JSON Web Token consists of 3 parts as Header, Payload, and Signature. The header contains information about the token type and the signing algorithm.
{
   "alg": "HS256",
   "typ": "JWT"
}
{
"alg": "HS256",
"typ": "JWT"
}There are many types of signing algorithms available, and each of them has unique features.
For example, symmetric algorithms like HMAC + SHA256(HS256) algorithm allows you to sign messages using a shared secret key, while the asymmetric algorithms RSASSA-PKCS1-v1_5 + SHA256(RS256) and ECDSA + P-256 + SHA256(ES256) uses a public and private key pair.
However, RS256 is the most recommended algorithm to use because,
It provides broader support in a variety of languages and implementations.
Only the private key holder can sign tokens, and others can use the public key to validate its signature.
You can request a valid token for various audiences with RS256.
If your private key is stolen, you can use RS256 to perform key rotation without re-deploying with the updated secret key. (But with HS256, you will have to re-deploy.)
NOTE
When selecting a signing algorithm, keep in mind to use a strong key if you use symmetric key algorithms as they are prone to brute force attacks. In other ways, asymmetric signing algorithms make key custody easier because the private key is kept only on the server-side to sign the token.
Always Sign the Token
After selecting an appropriate algorithm, you must always sign the token before sending it.
INFO
JWT signature is the fundamental security feature that ensures data (payload) within the token has not been altered.
To create a JWT signature, you need the encoded header, the encoded payload, a secret, and the algorithm specified in the header. For example, signature with HMACSHA256 algorithm would look like this:
HMACSHA256(
base64UrlEncode(header) + “.” +
base64UrlEncode(payload),
secret)
HMACSHA256(
base64UrlEncode(header) + “.” +
base64UrlEncode(payload),
secret)So, if there are any changes in the header or payload, you will have to create a new token signature.
Make Use of Time-Based Claims
It is crucial to define a suitable life span for JWT tokens since it is impossible to invalidate them. For instance, an id or access token cannot be revoked since it isn’t tied to any session.
TIP
So, you should set JWT lifespan as short as possible in seconds or minutes at most. But never set it in days or months.
You can use the exp claim to set the expiration time, and the token will only be valid if the current date/time must be before the expiry time.
{
  "exp":1300819380,
  "http://example.com/is_root":true
}
{
"exp":1300819380,
"http://example.com/is_root":true
}Similarly, there are 2 more time-based claims available to use with JWTs:
nbfclaim — A “not-before” period can be specified with this claim, and if the current time is earlier than the time in the nbf claim, the token will be denied.iatclaim — “issued at” claim defines the issued time of the JWT, and it can be used to reject tokens that are too old to use with your resource server or issued before a known incident.
Set the Issuer and Audience
Defining the issuer and the recipients in JWTs is another good practice to follow. You can use iss and aud claims for this, and it will make token management a lot easier for the recipients.
{
  "iss":"piumi",
  "exp":1300819380,
  "http://myweb.com/is_root":true
}
{
"iss":"piumi",
"exp":1300819380,
"http://myweb.com/is_root":true
}For example, if you are a receiver, you must verify that the JWT was issued by the relevant party (iss claim) and issued for you (aud claim) before accepting it.
TIP
Make sure that the iss claim’s value must an exact match of what you want it to be. For example, https://bit.dev/home and https://bit.dev.com are not the same issuers.
Don’t Use JWTs as Session Tokens
At a glance, using JWTs for session tokens may appear to be a smart option since no database lookups are involved with JWT for session validation. But, in reality, JWT is not a good choice for session handling.
With the complex standards of JWTs, users tend to make mistakes with the token settings, allowing attackers to clone them and pretend to be someone else.
Also, we should be able to “invalidate” a session by simply removing the session token from your session storage when users log out from the system. But, this is not feasible with JWT tokens. We can’t remove the token because it’s independent and has no centralized control to invalidate it.
Last but not least, as JWTs are large, using them in cookies brings a huge per-request cost. So, it is recommended not to use them as session tokens.
Where to store the JWT?
Let’s answer the big question.
We have three options available for storing the data on the client side and each of those has its own advantages and disadvantages. And the options are:
- Cookie
- Local Storage
- Sesson Storage
Cookie
If you set the JWT on cookie, the browser will automatically send the token along with the URL for the Same Site Request. But it is vulnerable to the CSRF. We can protect the site against CSRF by setting a cookie with SameSite=strict
Pros:
- The browser will automatically send the token to the server.
- The same token is available to multiple tabs of your application instance.
Cons:
- Vulnerable to XSS.
- You need to attach the token in the header if you use a protocol like OAuth 2.0.
LocalStorage
The localStorage doesn’t send the data automatically along with the URL. So you need to implement the system for the auth token for every URL. But the best part is that this method is not vulnerable to CSRF.
Pros:
- Not vulnerable to CSRF.
- The same token is available to multiple tabs of your application instance.
Cons:
- Vulnerable to XSS.
- You need to implement a mechanism to send the token.
SessionStorage
Session Storage is pretty much the same as Local Storage, except the token will accessible only one tab, once the tab is closed the session got destroyed. So it not useful for the feature like remember me. But this can be used in the multi-login feature like Tab A is in a different login and Tab B is in different login.
Pros:
- Not Vulnerable to CSRF.
- Easy to implement Multiple logins in one browser.
Cons:
- Vulnerable to XSS.
- Once the tab is closed, the session data got destroyed.
TIP
You might notice that all the 3 methods have the same con — “Vulnerable to XSS”. Yes, all these methods are vulnerable to XSS. Please do care about XSS and always follows the best practices for XSS protection.
Conclusion
JWT is a simple yet reliable mechanism to share security information between two parties. But, when you are using JWT, you need to be aware of the best practices to get the maximum from it.